What takes tailgates, picnics, outdoor parties and gatherings up a notch? Competitive games like cornhole, of course. Learn how you can make your own cornhole sets, plus show your pride for your college alma matter from this Family Home of the Month project.
The Backstory
When the pandemic hit, outdoor games surged in popularity. Remember those “social distancing” days? Cornhole was a safe way to gather with loved ones while still having fun and connecting.
So, when my husband finished our basement renovation — and we had leftover plywood and 2x4s — we thought cornhole sets would make for creative Christmas gifts for some of our relatives. But not just any regular cornhole sets. College-themed cornhole sets.
My sister-in-laws both attended American University, while their husbands attended the United States Naval Academy and Wake Forest University. Each couple got their own set with one board repping their college.
The Project
You could easily complete a cornhole project of your own in one weekend.
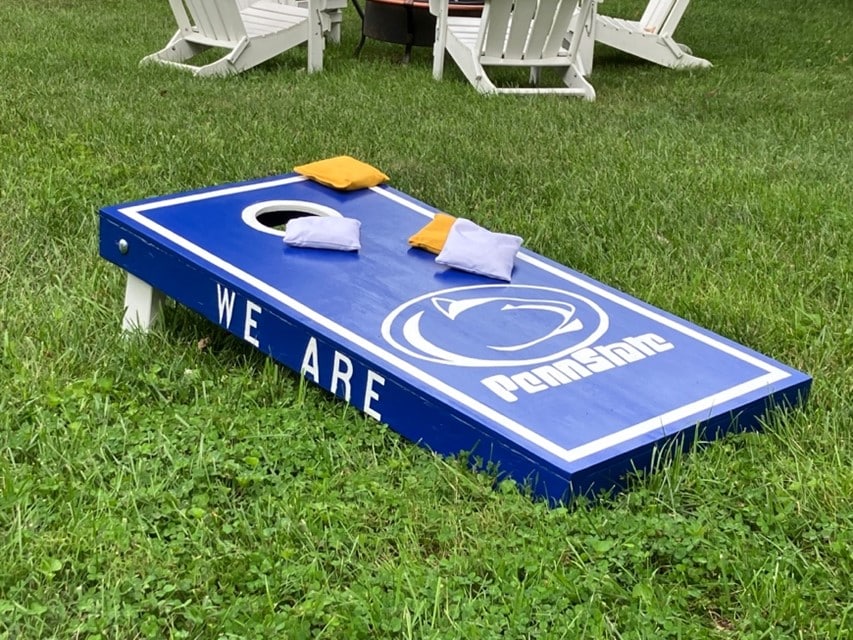
For my husband’s board side, James Madison University. The Pennsylvania State University for me. Since I can’t help myself and all Nittany Lions will understand… “We are! Penn State!”

Materials
Tools

-
To begin, the plywood for one set is half of a full sheet of plywood. If you don’t have a circular saw or table saw at home, ask the Home Depot employees to cut the plywood for you. My husband cut it with our Kreg circular saw guide to get straight cuts.
-
For the 2x4s you’ll need four 8’ long pieces that you’ll then cut to size. Cut them with a miter saw to 2×4 x 48” and 2×4 x 21” for the frames. Tip: when buying 2x4s, look for the straightest pieces with the fewest knots.
-
Next, attach the 48” pieces and the 21” pieces to make a rectangle. The 21” piece should be used inset of the 48” pieces. The thickness of the 48” pieces, plus the 21” piece will make your frames a full 24” wide. Use the 2 1/2” deck screws for these attachments.
-
The plywood pieces should fit directly over the two frames you built. Attach the plywood faces to the frames using the 1-5/8” deck screws. Put one in each corner and then two additional in the top and bottom of the plywood and four additional deck screws on each side for 16 total screws in the face of each board. We used a counter sunk drill bit, so the head of the screw is below the wood. Then go over the screw heads with wood filler.
-
After the wood filler has dried, use an orbital sander to sand the wood fill, as well as the rest of the boards smooth.
-
Once sanding is completed, it’s time to make the hole for the board.
-
Start by marking the center point of the hole. The center will be 9” down from the top edge of the board and centered on the width (12” off the side). Using that center point, take out your compass and make a 6” diameter hole. Once the hole is drawn, drill a hole into the marked out area with a drill bit big enough to insert your jigsaw blade. Grab your jigsaw and cut out the 6” diameter hole that you drew. We did a 6” circle and a 7” circle because we painted a ring around the hole.

-
For the legs, cut a 2×4 into four 11-1/2” long pieces. Make a full 3-1/2” radius cut on one end of each leg. To make the cut, measure 1-3/4” down the length of the 2×4 and draw a line across it. Place a compass point centered on that line, then draw the arc.
-
Afterwards, place the leg inside the frame of the board with the radius piece up against the vertical piece. Clamp the leg in place. Find the middle of the line used to make the radius and drill a 1/2” hole through the leg and the side of the frame.

-
Next up: installing the legs with the carriage bolts. Push the carriage bolt through the new hole on the exterior and attach two washers. Then attach the new leg, another washer and the wing nut. You may need to remove the leg and sand down the radius top if they’re contacting the frame. The washers between the frame and the leg are intended to keep the leg from rubbing the inside of the frame.

-
To cut the angle on bottom of the leg, turn the box rightside up and set it on an elevated surface with the legs tucked underneath. Place a block or anything that’ll hold it up under the box, so the back of the platform is 12 inches off the table. Following, slide the box to the edge of the table and pull down the leg closest to the edge, so that it hangs just past the edge. Using the tabletop as a guide, draw a straight line across the bottom of the 2×4. Repeat for the opposite side.
-
Then cut along the mark with your circular saw. Once this is complete, the box is fully constructed.
-
Now, it’s time to paint. No matter your design, you’ll need to prime the entire board with one coat of primer. Sand it afterwards. Next, use a pencil to draw your design. In the photos below, you can see how to use painters tape to protect your design from the main board color for the USNA board. After the main board color dries, pull off tape and paint the remaining white section.

-
If you don’t have artistic skills, stencils can assist with drawing and available online. I wasn’t able to find a stencil the right size, so I bought a smaller one and used a light trick to increase it in size.

-
Set the board up vertically in a dark room. Then, a few feet away, set up the stencil vertically. Tape the stencil down to hold it still. Put a light source like a flashlight behind the stencil and aim toward the board. The stencil will cast a shadow on the board. Adjust the size of the shadow by moving the board closer or further from the light source for the desired stencil size.
-
Once the painting is complete, I highly recommend using a polyurethane. It’ll help the corn sacks slide better and increase the durability of the board. I applied seven coats of a water-based polyurethane to our boards. Once dried, the boards were good to go!
-
You can DIY your own sacks using a fabric of your choice and whole kernel corn. To keep it simple, I purchased ours at cornholeworldwide.com and got synthetic fill to help them last longer.
-
Whether it’s a friendly family game or higher stakes tournament, let the games begin!

Special Thanks
All images and expertise courtesy of my handy husband, @ PinkDoorandMore on Instagram. Give him a follow to see more DIY projects he miraculously accomplishes with three daughters ages five and under distracting him.
By Lauren Burke Meyer