Let’s get a little fancy!
The Kentucky Derby brings to mind horses, racing and tradition. However, one of the most fun and interesting features are the fancy hats and fascinators! So much creativity goes into designing these gravity defying hats, that they almost steal the show.
While your family may not be attending a fancy event to warrant buying one of these expensive decorative headpieces, making your own is not as hard as you think. This easy craft can use things around the house and is a great way for kids to use their creativity while engineering a piece that will reach for the stars.
Supplies Needed:
- paper plate/ cardstock/ thick sturdy paper
- scissors
- craft glue/ hot glue (hot glue helps the project dry quickly)
- construction paper/ decorative paper
- ribbon/yarn or headband
- hole punch (optional)
- items to use to decorate such as tissue paper, faux flowers, construction paper, feathers, beads, netting, paper cups, fabric scraps paint, crayons, recycled material (encourage your kids to think outside the box and test out different material or objects)

Kids DIY Fascinator Craft
- Cut your paper plate or cardstock into your desired shape.
Skip this step if you want to keep the shape of the paper plate. Otherwise, cut your cardstock or paper plate into the shape you want for the base of your hat.

- Trace the base on the top piece of paper.
Trace your base shape onto a piece of construction paper or decorative paper.

- Cut out the top paper.
Cut out the shape for the top.

- Make two small holes toward the center of the plate with about an inch of space between them.
Using your scissors, make two hole about the size of a hole punch towards the middle of the shape, with about 1–2 inches of space between them. Depending on how you want the hat to sit on your head, the two hole can be placed off-center as well.

- Measure out ribbon or yarn to go over your head and tie under your chin.
Take the ribbon and wrap over top of your head, behind your ears and under the chin. Make sure you have enough to make the bow under the chin. Cut the yarn/ribbon to the correct length. Skip this step if you are using a headband.
- Thread the ribbon/yarn/headband through the two hole on the base.
Take the paper plate or cardstock base and thread the band through the holes.

- Glue the base and top together
With the band still in place on the base piece, apply glue around the edge of the base on the top side, opposite of the side that will be facing your head. Making sure they are lined up correctly, place the top piece on the base. Allow to dry.

- Make decorations (optional)
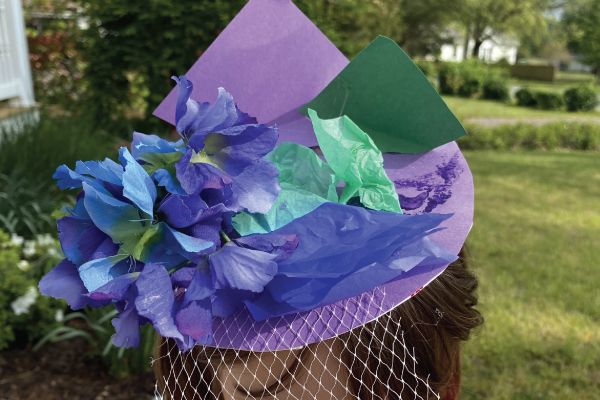
While the glue is drying, create some fun shapes out of paper or the material you are using. Bonus points if you can create a using recycled material like like bottle caps or egg cartons. We used construction paper scraps for fun shapes and netting from a fruit bag as a mini veil.

- Decorate!
This is where creativity and engineering meet in a fun way. Pick the objects you want to add to your piece and try out different arrangements. Once you are satisfied, glue them on. You can also create objects /shapes using paper. Make sure any objects you use aren’t too heavy or they could tear off the piece once it’s on your head.

Show it off
Now that your family has their fascinators done, get a group shot and share with your friends. Or get dressed up and have an elegant tea party. This project is great to do on a rainy day, during a birthday party or to prep for your “fancy” event.